Doors need to be intriguing, welcoming, and seem to whisper, “please come discover what’s inside.”
I LOVE doors! When my husband and I traveled Europe with our friends, I took pictures of every beautiful doorway I could find. I even have a section in my“art board” on Pinterest with doors.
I should have taken pictures of the famous sites we visited, but I have more photos of doorways than anything else. LOL
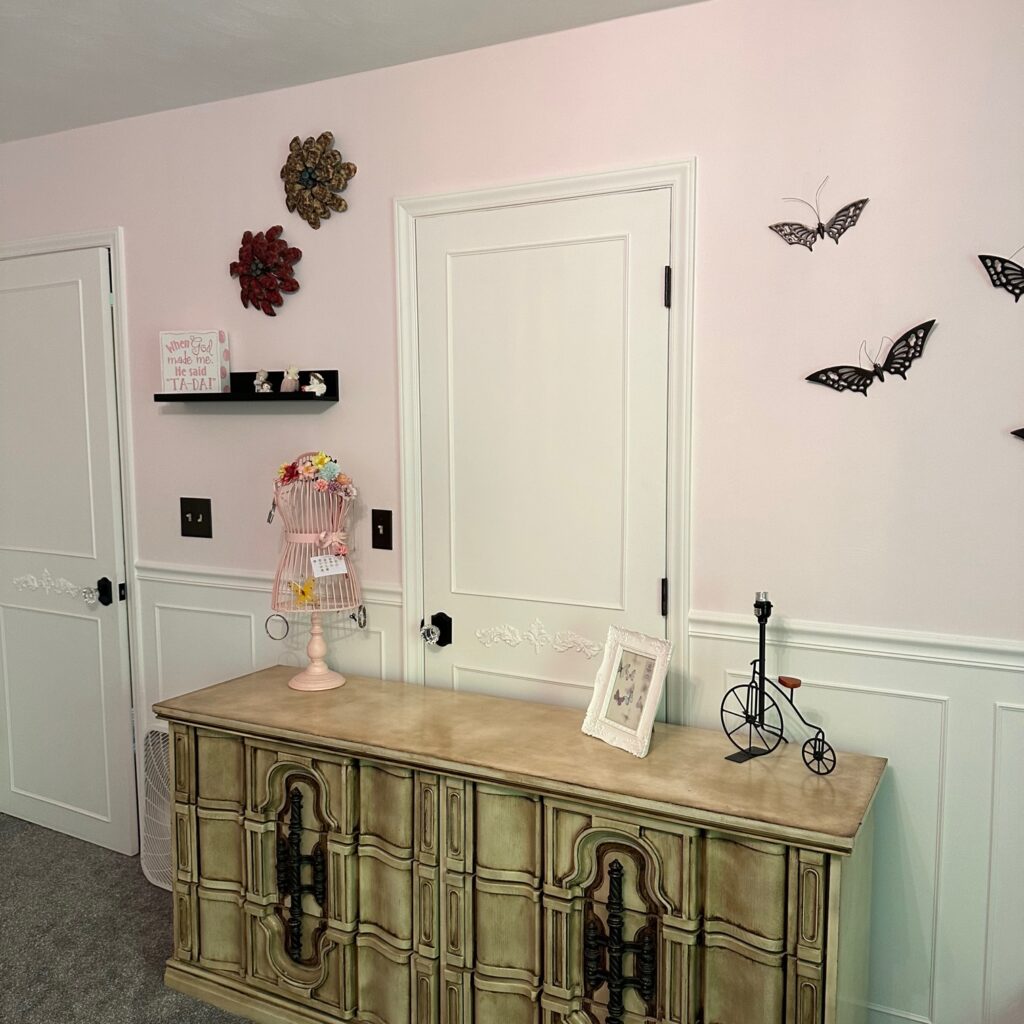
I’m excited to share this simple DIY project that transformed my daughters’ uninviting bedroom doors.
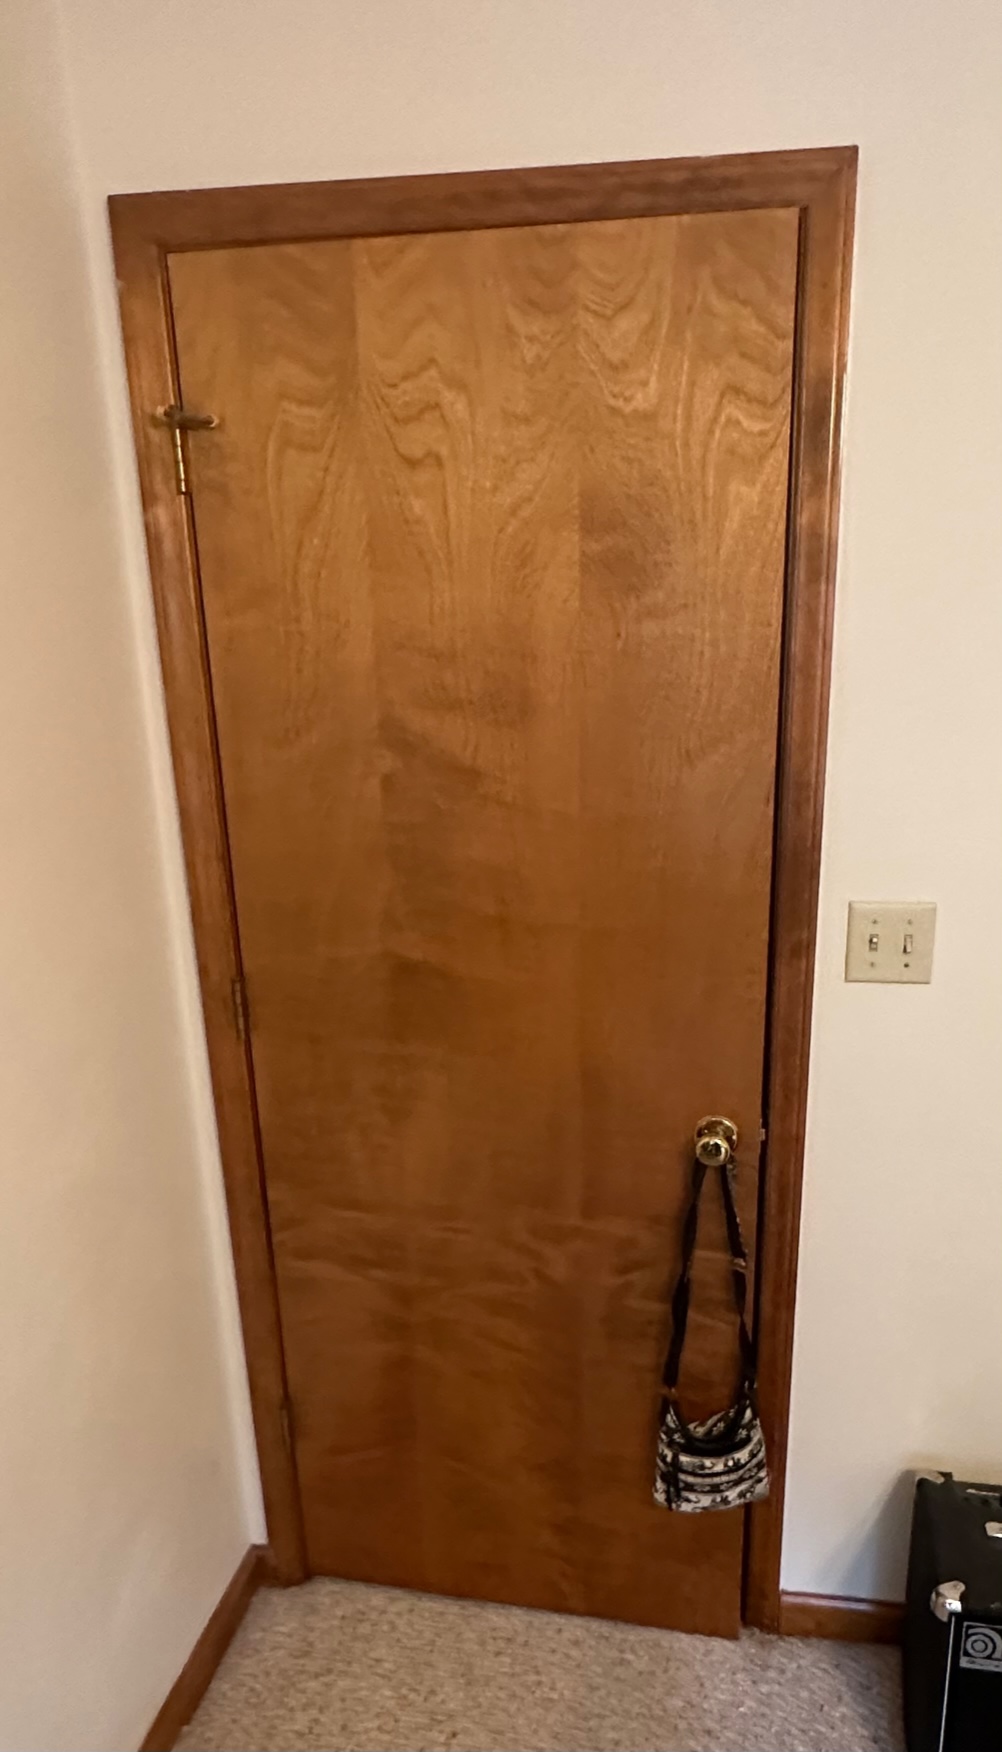
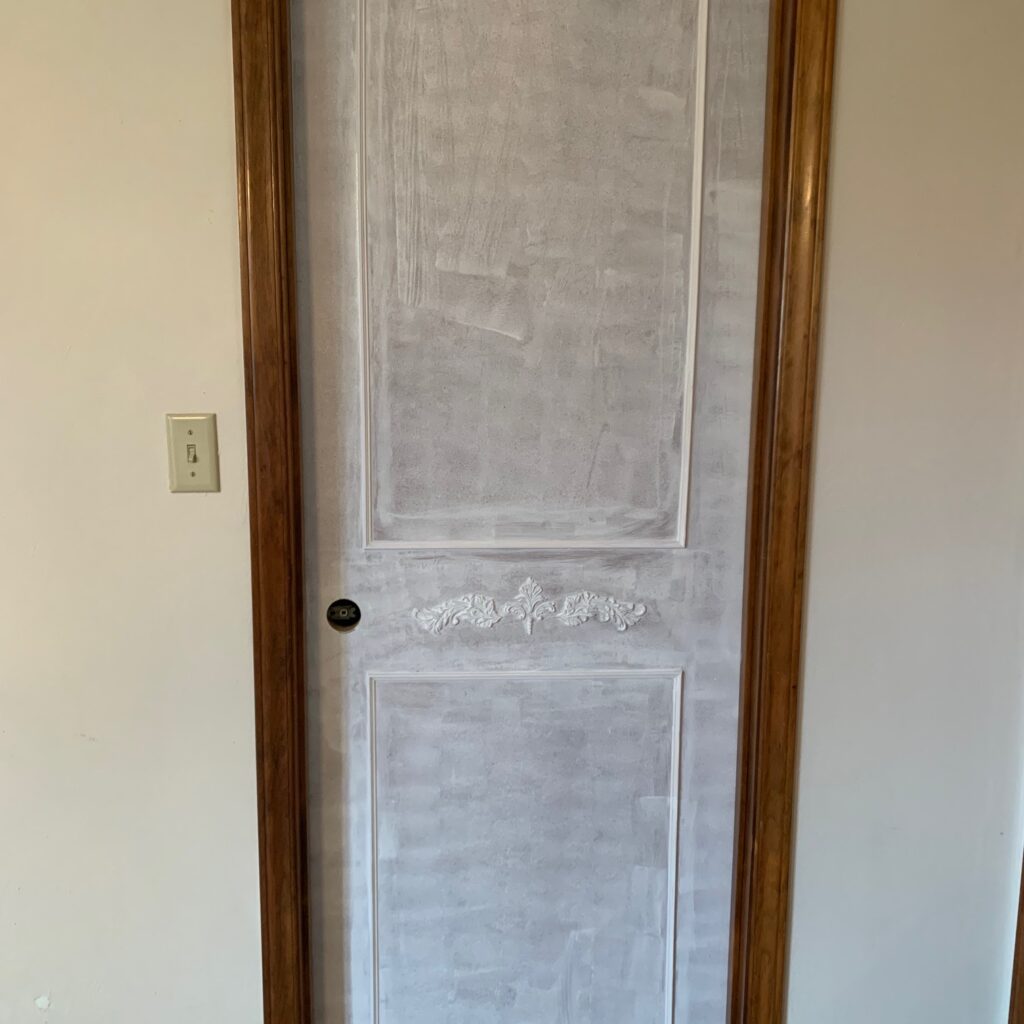
Here’s what I’m working with…. about 40-year-old hollow doors, you know, the purely functional doors that just get the job done.
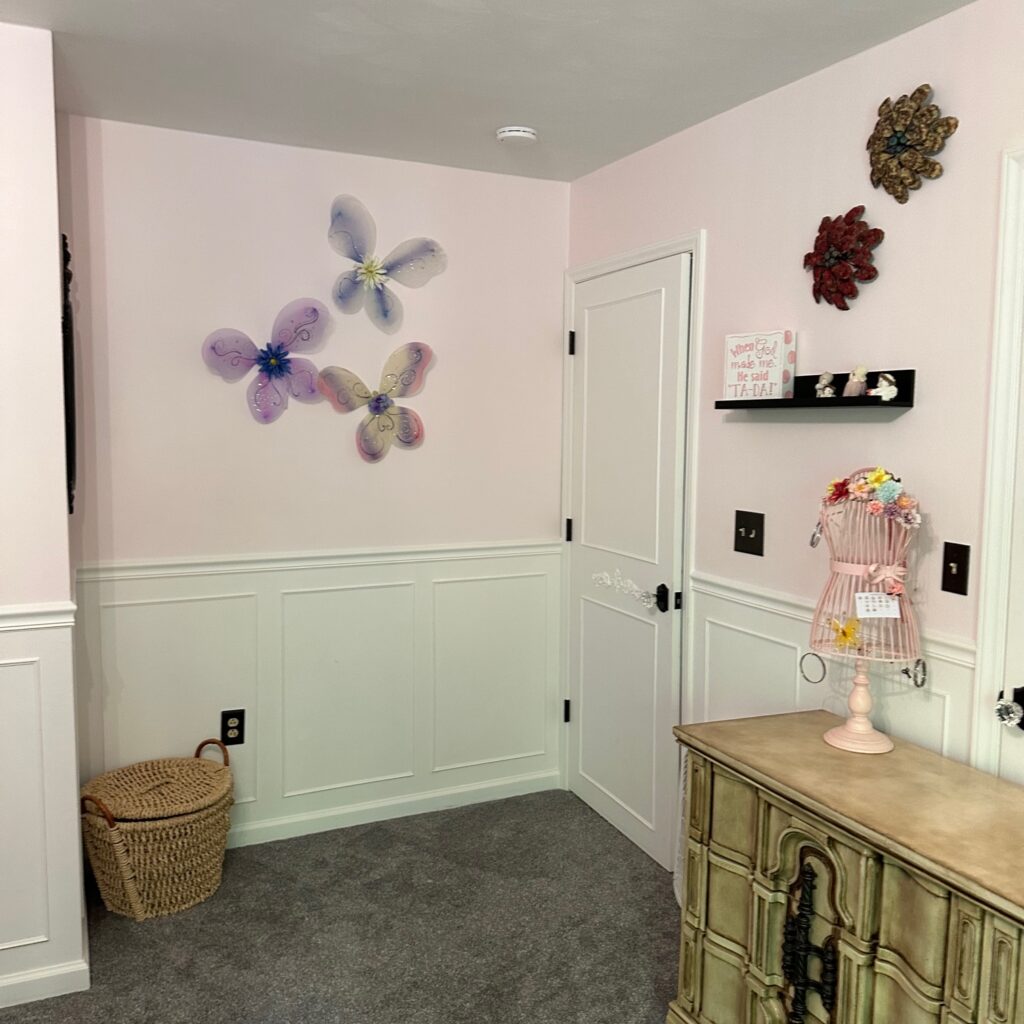
Eeessshhh. This doorway definitely does NOT make me want to go through it.
This diy project is actually three separate doors, that I used the same method on.
There is one door going from the hallway to the bedroom, one from hallway to bathroom, and one door going between the bedroom and bathroom.
The one between the bedroom and bathroom, got a fresh diy door makeover on both sides.
(This page contains affiliate links throughout, that I will earn a small commission for qualifying purchases made after clicking through. I am only recommending products that I personally used for this project.)
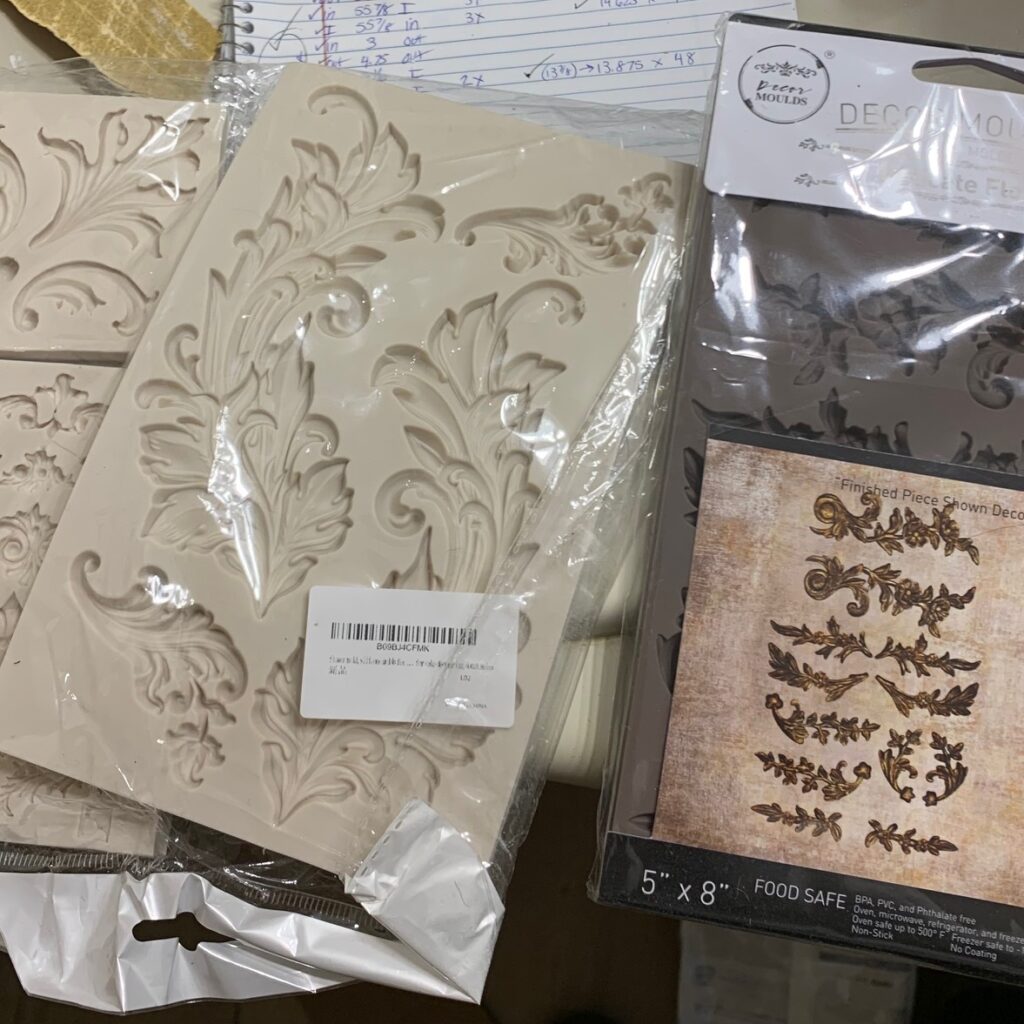
First, decide which patterns you’d like to use from the baroque silicon molds. (These are also great for crafts, and usable for fancy desserts! Exciting!)
Baroque Silicon Molds. I used the upper left, and middle molds in this DIY Project.
Method:
Heat the hot glue gun. Squeeze hot glue into the baroque silicon mold patterns you’d like to use. Allow the glue to dry completely before removing from the silicon mold.
Continue creating enough hot glue embellishments from the silicon molds until you have all the pieces you need for the design you want on your doors.
If you have multiple doors you want to use the same design for, lay the pieces needed for one of your doors on top of a piece of paper. Make sure the individual pieces are in the exact position you’d like them to be on your door.
Carefully press each piece down to hold it still with your non-dominant hand. With your dominant hand, trace the piece you’re holding onto the paper. (If you only have one side of a door makeover to do, then skip tracing the embellishments.)
Once you have each piece traced onto the paper, place a long piece of blue painters tape across all of the individual pieces.
This will help all the pieces stay in their proper place in relation to each other, while transporting them. You may need to use several pieces of painters tape in order to ensure the individual pieces do not shift.
When you have the first set of embellishments taped together in place, set the next set onto the paper, inside the lines you traced from the first set. Tape again, as you did before.
Try to not cover the outside edges of your design with tape, as this will be needed as a visual guideline when you adhere it to your door.
Method: DIY Door Makeover Project
1. Take Measurements
Before beginning, remove the doorknob, and doors. Set hinges and screws aside for their upgraded makeover later.
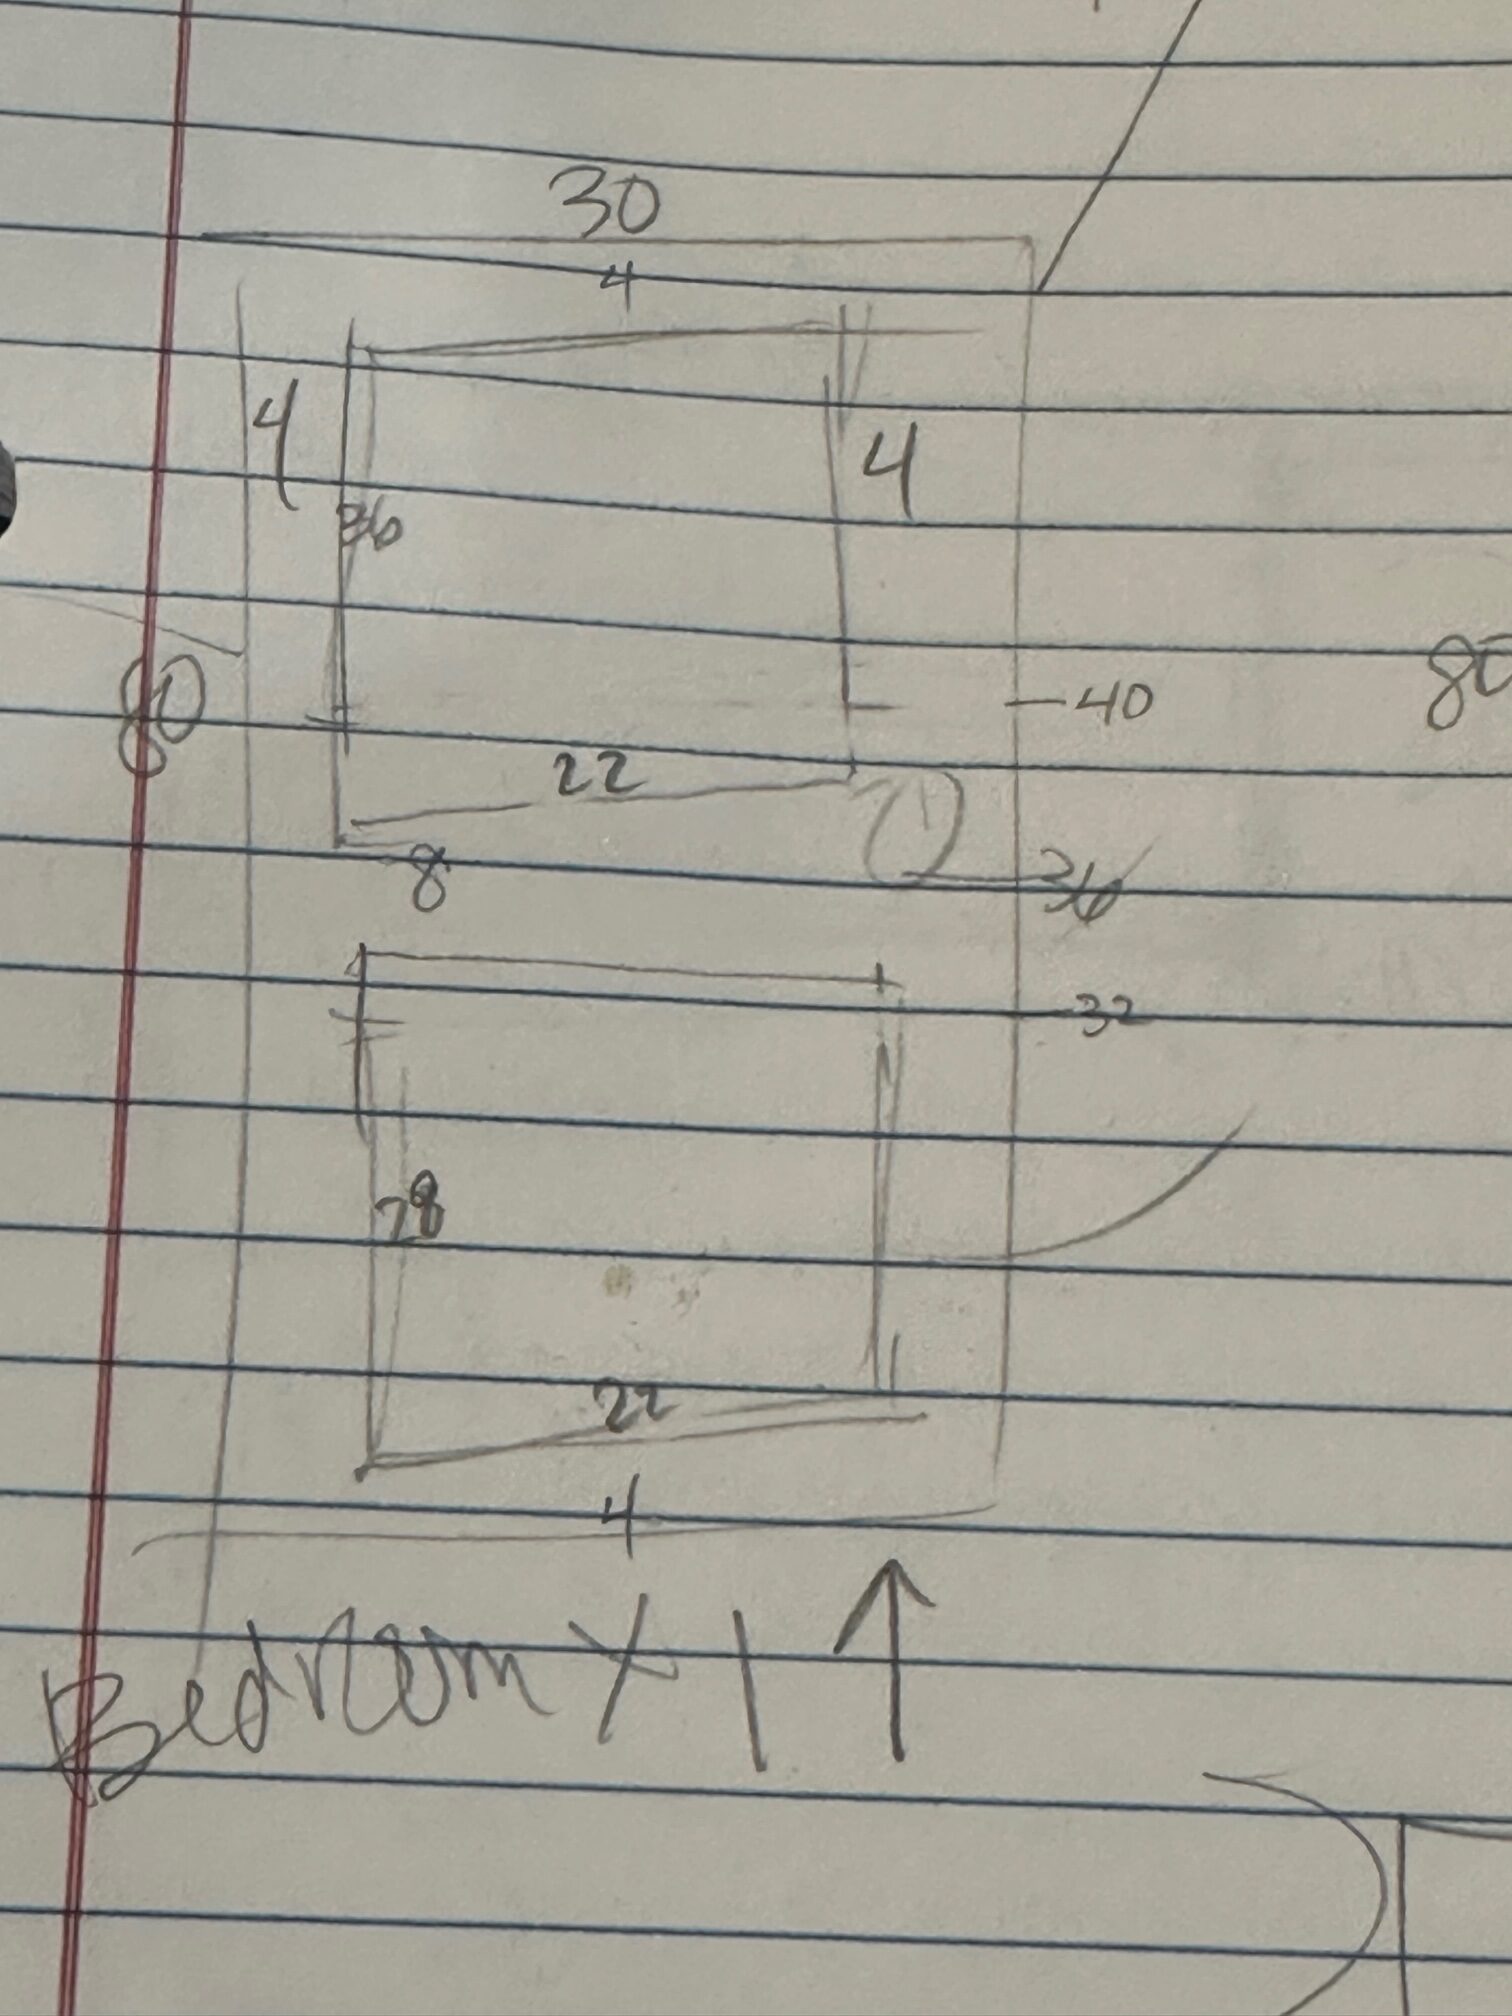
I’m very visual so I have to draw pictures for myself. Grab a notebook and pencil, and draw a rectangle, and a small circle where the doorknob is.
Take the length and widthmeasurements of the door first. Be careful to only work in one increment. I used inches.
My door measurements are 80″x 30.”
Now find the vertical midpoint for reference. Mark this on your door with the permanent marker.
You’ll notice that the doorknob is not exactly on the midpoint.
Now you have to decide how much spacing you want for the picture wainscot around the edges. I used 4″. Measure and mark this around the entire door with the permanent marker.
The difficult decision was to choose how much spacing I wanted in the center to leave for the embellishments. It needed to have enough space to “breathe” and to allow for a beautiful, finished product without feeling crowded, or overdone. I held my hot glue embellishments and my tape measure up to get a visual idea of how much negative space I wanted around them.
I decided that 8″ between the top and bottom frames would be ideal. I marked the center of the doorknob opening and used this as a landmark for the center of my embellishment area. I marked 4″ above and 4″ below this line to get the 8″ space I wanted.
This leaves the measurements for the actual wainscot molding frames. The top frame will be longer than the bottom frame, but both will have the same width.
My top frame is 36″x 22″
My bottom frame is 28″x 22″
Once you get all your measurements taken, double check each measurement to make sure that this is exactly what you want. Measure twice, cut once!!!
When you are exactly sure what measurements you want, mark them all on your door with your permanent marker.
2. Cut Wainscot Molding
Before using a power tool, please ensure you have all the properly fitted safety equipment. Always use proper hearing and eye protection.
Also read entire section before proceeding.
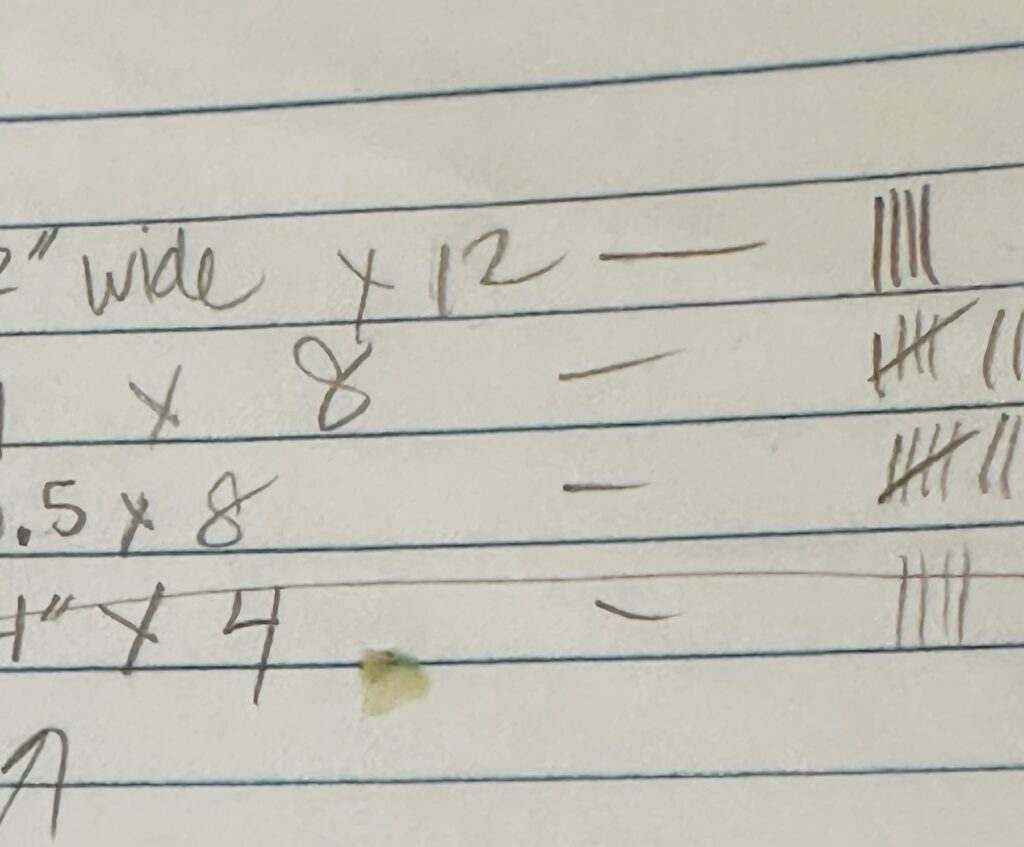
I wrote down the measurements I wanted for all of the frames and tallied up how many of each size I needed to cut.
(Remember, I had multiple diy door makeovers projects I was doing at the same time, so my list of wainscot molding pieces has more than just 8 in total.)
To cut the wainscotting frames for your diy door project. First, cover the end of each molding piece with blue painters tape before cutting. This helps the tiny molding not “fray” when it’s cut.
Note: when using a miter saw, do not cross your hands over the blade. Keep your left hand on the left side of your work, and right hand on the right side of your work, regardless of the task you’re doing. Please be safe!!
Set your miter saw to 45 degrees on the right side. Place the molding flat side down, with the big side firmly against the back rest. Slide the molding so that you’ll be able to just trim the left side edge off in order to make a nice 45 degree cut.
Measure the wainscot molding from the outside edge of the molding. This is the bigger side. Now that you have a nice 45 degree cut, you can easily place the tape measure on the edge of the wainscot molding to make an accurate measurement. Measure the size of the frame pieces you’ll need, and precisely mark them with a fine tipped pen.
Once you have the left side cut at a 45 degree angle, and the measurement marked, set your miter saw blade to 45 degrees on the left side. This is the most critical cut, since it’s measured, and you need two identical pieces for each length and width of each picture frame you’re making.
Note: If you don’t have a miter saw, here is a guide you can use with a hand saw.
Tip: I place my molding firmly on my saw table against the back guide. Without putting my finger on the trigger, I bring the blade down to see exactly where my cut will be made. This way I can make sure I’m accurate, and my cuts are consistently precise.
You’ll have to repeat this process in order to make each wainscot molding piece you need. Once you get comfortable, this process becomes easy. I actually love it! The smell of cut frames is comforting and nostalgic.
Tip: Mentally figure out how many pieces you can cut from each stick of molding, as they usually come in 8′ pieces. Sometimes it’s more efficient to mix and match the cuts you need, rather than just take all of one size at a time. This way you can save on materials.
3. Adhere Frame and Embellishments to Door
Read all directions for this step before beginning.
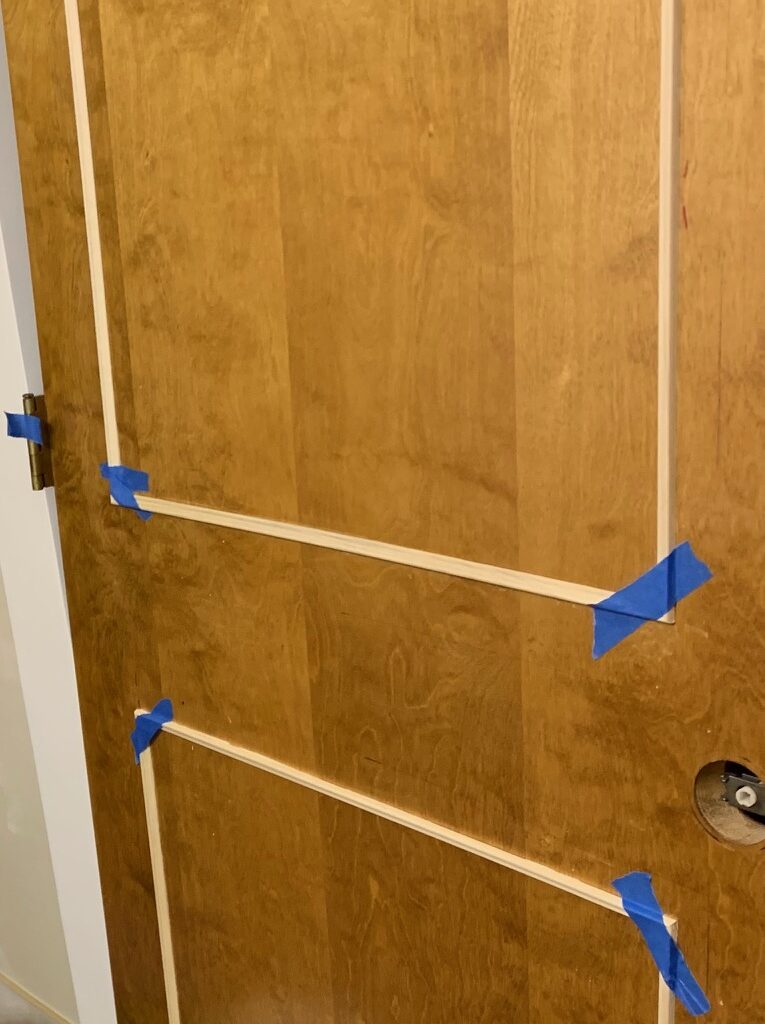
Dry fit your frame pieces directly over the markings you made earlier on your door. They should fit perfectly.
Separate the top and bottom frame pieces. If you need to, lay each frame out with its corresponding frame pieces, for visual clarity.
Tip: This is for the Liquid Nails Adhesive“>Liquid Nails on one length piece, one width piece, and a small dab on one of the corner pieces between the two.
Pick up the width piece, and place on top of the line you drew earlier. Try to eyeball where the center is and press firmly so the frame piece will stick to the door.
Don’t worry about the glue that comes out from underneath yet.
Use the leveler to quickly check that your molding is level.
Quickly grab the second piece you just put glue on and place it over one of the vertical lines you marked earlier. Carefully match up the corners. Press both edges firmly again.
I like to clean up the edges now before moving onto the next frame piece because I don’t want the Liquid Nails to dry. A slightly damp rag works great for this. Use blue tape to hold the frame pieces in place until dry. I recommend waiting 24 hrs.
Repeat this process for the following top frame pieces until you’ve completed the whole top frame.
Check all sides again with the leveler and make small adjustments as needed.
Then repeat the entire process for the bottom frame.
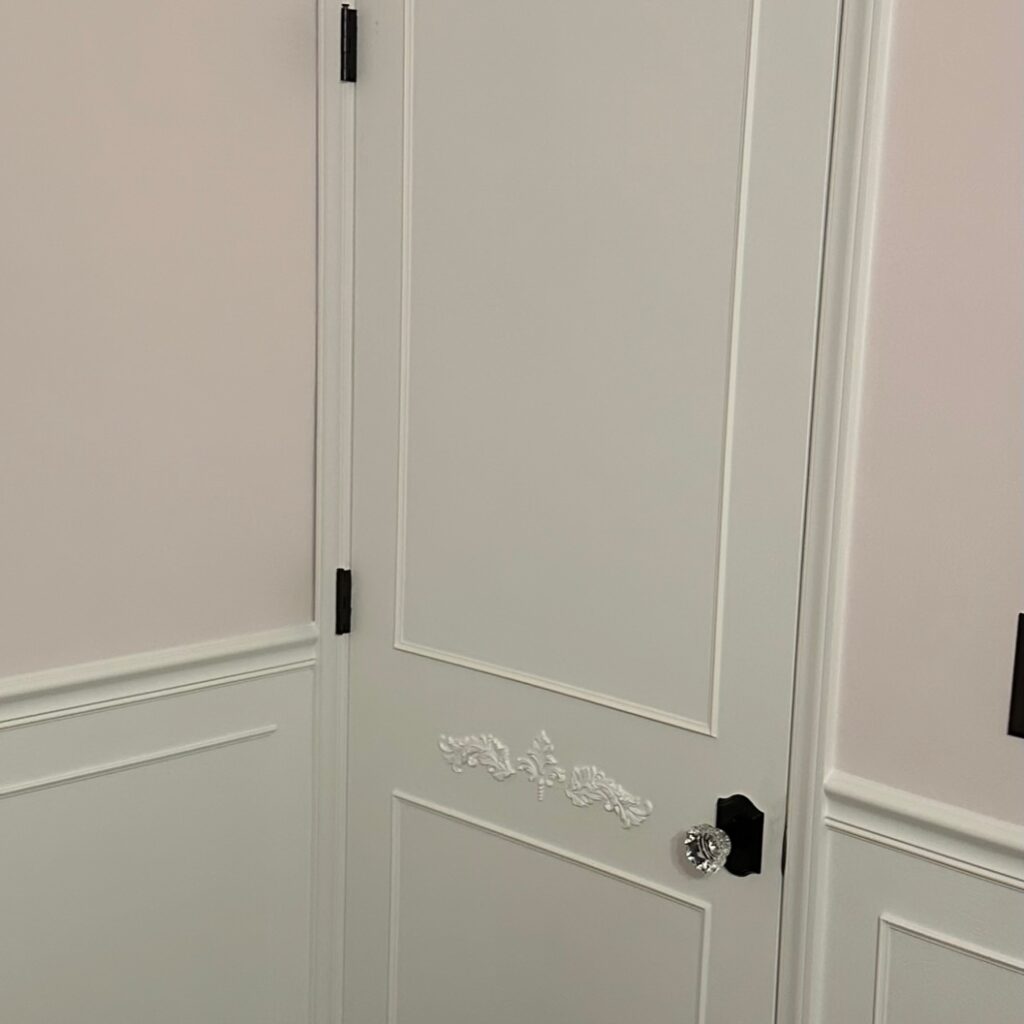
Adhere embellishments to door.
Dry fit your embellishments to the center of your door. I just “eyeballed” mine. If you need a little more guideline, feel free to measure and mark the center, and where you want to place your embellishments beforehand.
Use a small amount of Liquid Nails on the back of your embellishments. Place in the center of your door firmly. Use blue tape to hold the embellishments in place until dry. I recommend waiting 24 hrs.
Note: Liquid Nails is very strong, but it gives a few minutes of working time if you need to adjust your wainscot frame pieces.
If you use too much, it will make a huge mess, and your frame pieces will be more apt to slide out of place. If you use too little, the frame will need to be re-glued later. In my opinion, less is more in this case.
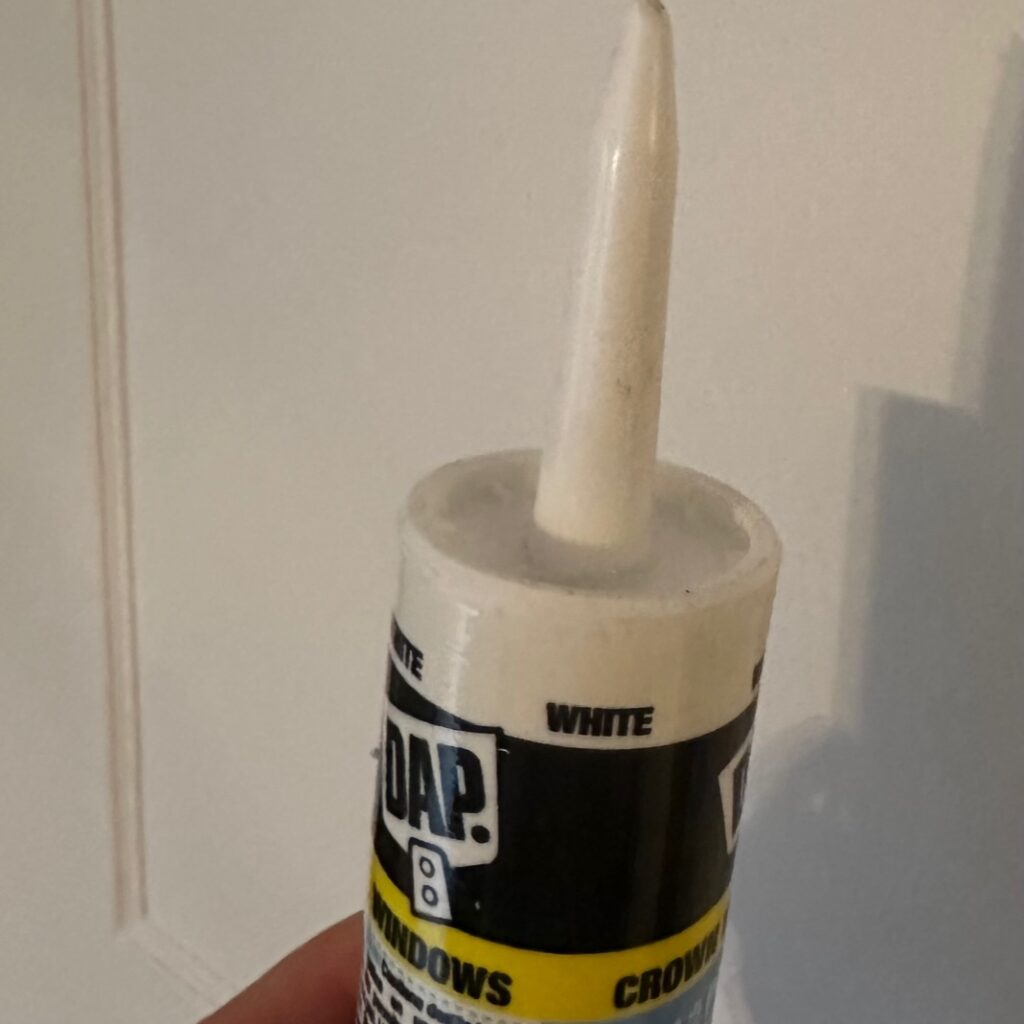
I use a piece of blue tape around the tip of my Liquid Nails bottle so it doesn’t dry out in between uses.
4. Apply Caulking
Before caulking your frames and embellishments, check to make sure everything is secure. If there are any parts that are not secure, apply more Liquid Nails and re-tape to hold it in place. Wait until adhesive is completely dry before proceeding.
When everything is secure and dry, use a very small amount of caulking along one side of the wainscot frame at a time. Then smooth it with your finger.
Again, less is more in this case. Clean up any mess with a slightly damp rag. It’s ok to take your time in order to make a flawless edge.
The attention to tiny details really makes a huge difference.
Repeat this process on all of the wainscot frame edges, inside and out. The inside corners are the trickiest. If you have small fingers, it’s not so bad, but you might need to use a tool, like the back of a pen cap, in order to get a smooth finish in this tiny space.
Caulking the embellishments is very tedious, but I believe it’s an important step. I used my finger to apply a tiny bit of caulking around the edges, and toothpicks and q-tips in order to clean up the edges.
5. Prime and Paint
I used a stain blocking primer, because it’s super effective, and can adhere to nearly any surface. This was helpful, so I didn’t have to strip anything off the doors beforehand. I was able to just use primer and move on.
I used an edging paint brush around the wainscot frames and also the embellishments. This allowed me to really get into the tiny spaces, in order to keep all the details. Then I went over the flat parts of the door with a small furniture grade paint roller. A large paint roller is possible to use, and takes less time, however it’s a little difficult to cover all the small spaces.
I used two layers of primer, and two layers of paint. I allowed several hours of drying time in between each layer. Read the directions on your primer and paint cans to determine exactly how long you need to wait.
6. Hinges and Screws Upgrade
While waiting in between coats of primer and paint, take your hinges and screws outside. I stuck all my screws into a piece of cardboard, so they stood upright. Lay the hinges on the cardboard. Make sure nothing overlaps.
Use Rustoleum Oil-Rubbed Bronze to lightly coat the hinges and screws. Allow to dry. Apply a couple more coats until all sides of the hinges are completely painted, and the tops of the screws are covered.
I also did this with my light switch covers as well. I’ve used this in the past and have not had a problem with scratches with use over time. If you’re worried, you can seal it with some polyurethane, just research which version is best for this diy project.
7. Install the Doors and Knobs
Reinstall the door with your upgraded door hinges and screws.
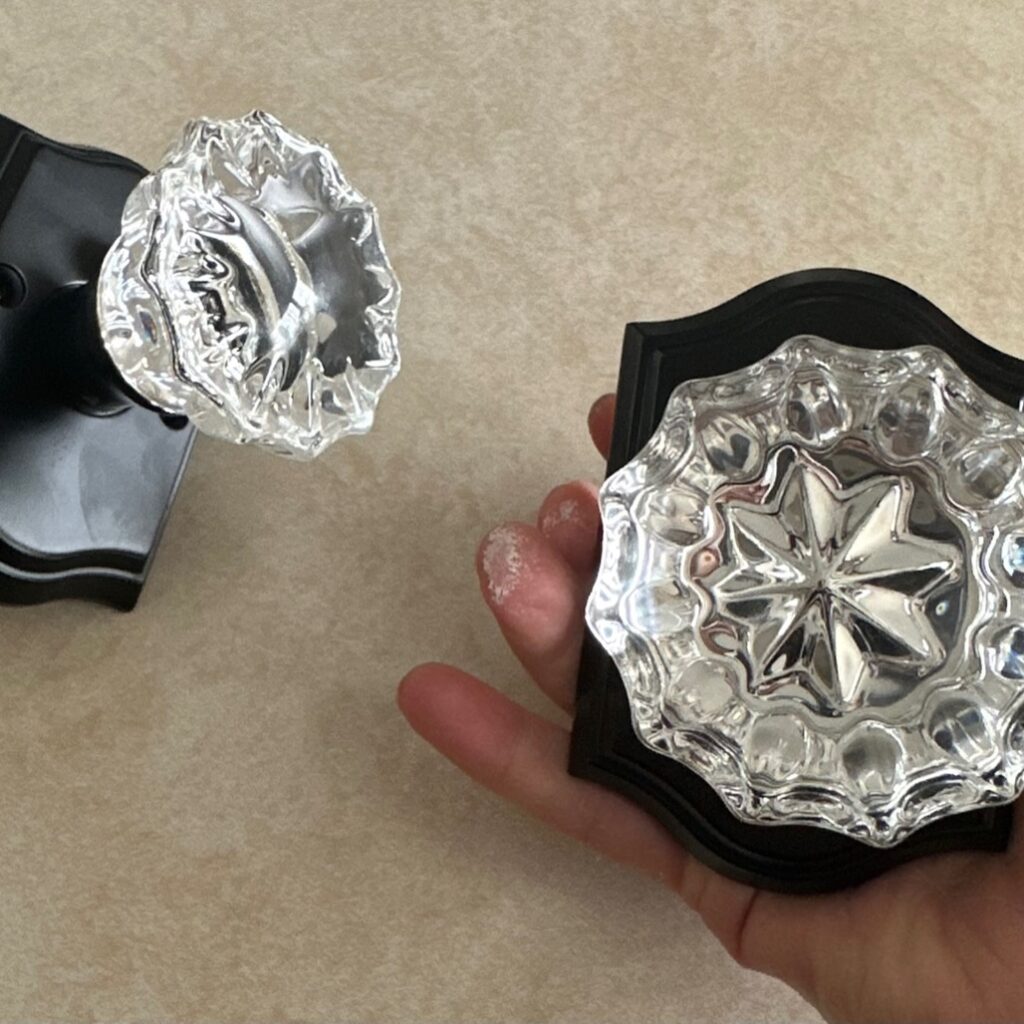
Oooh, just look at these crystal doorknob“>ew doorknob in order to install it correctly. It’s pretty straightforward though, and basically the same as installing any doorknob.
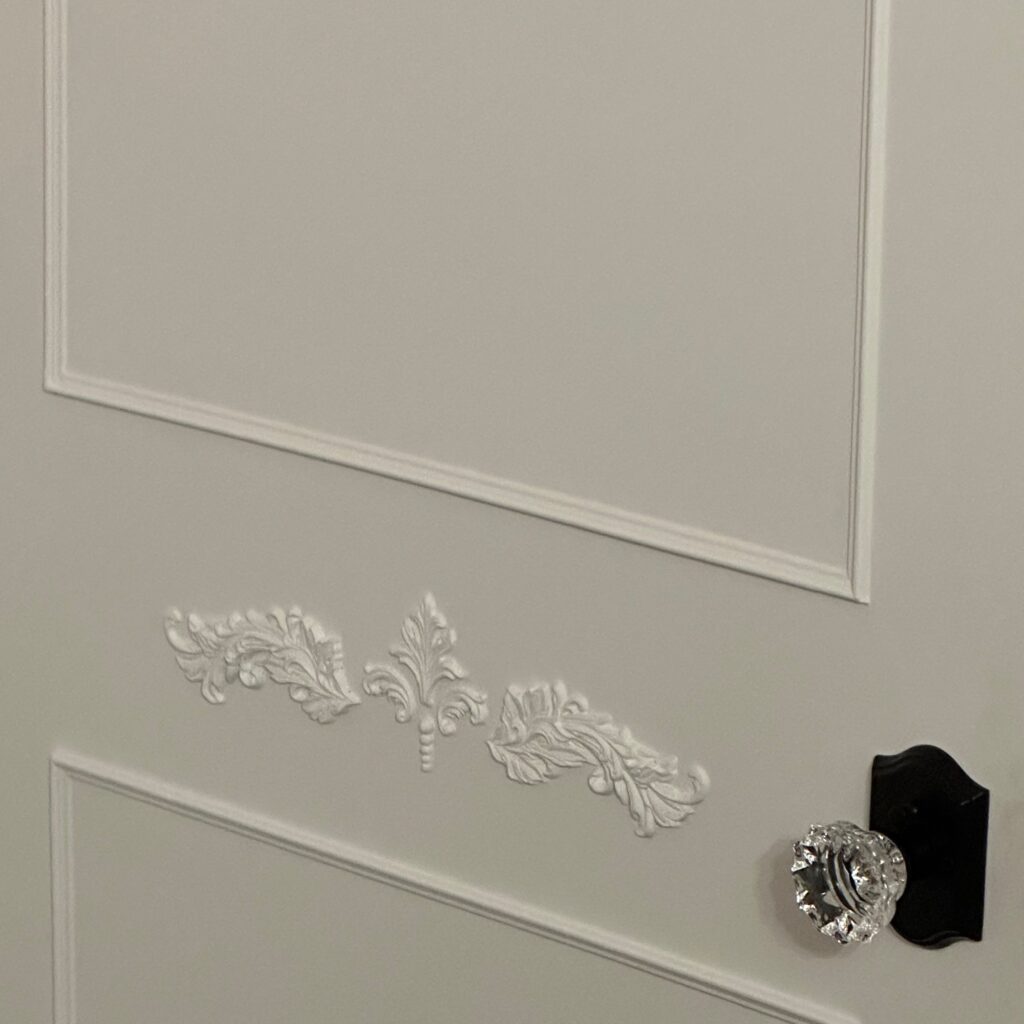
Finally, admire the magically welcoming diy doorway you’ve just created!
Just look at that beautiful door!! Can you believe the transformation? And so easy too!
It always makes my heart smile after transforming something functional into something exceptional.
Now it's YOUR turn!
I hope you enjoy making a beautiful and magical diy door in your home!
Feel free to contact me with questions. And please subscribe!